4 Further Steps For Applying Makeup

make up artist

Nearly prepped!

In my first article on 4 Starter Steps To Applying Makeup, we looked at the basic foundations of getting your face ready. Now we will look at the final steps involved in the preparation stage.

  1. Apply the concealer

Concealer is used to even out the skin that may be blemished or to hide dark circles under your eyes. It can also be used to brighten up darker areas of your skin or for the higher points of your face using a lighter shade.

Using a concealer brush or clean fingers, you blend the concealer in the area under your eyes, using an upside down triangular pattern.

Use a shade that matches your skin tone to hide any areas of redness and any visible acne or spots. Then blend in the concealer edges so to seamlessly blend with your foundation.

  1. Apply your highlighter

Now that your foundation is completed, your face may now look flat and free of any contours due to the uniform colour. To give it some depth, you’ll want to create an illusion of some shadows and highlights.

For this, use a cream or powder highlighter to brighten up the deepest areas of your face. This will add some brightness and more life to your face than if you left it alone.

  1. Add some depth through contours

This is the opposite of highlights. Contouring uses adding a darker shade of powder to any areas that you would like minimized. Contouring under the cheekbones, nose, and under the jaws are the typical areas.

After your face is contoured, you could add colour using a bronzer.

  1. Sparingly, apply some blush

The last step in preparing your face is to add some blush to those cheek bones. The cheeks carry a bit of colour, no matter what your skin tone is or what race you are. It does vary a little from person to person.

Using a large brush, apply your blush onto your cheeks (the large areas that form when smiling). Be subtle with your blush. Simply add just enough to rejuvenate the natural colour.

  1. Fill those eyebrows (optional step)

This is optional so it really depends on the eyebrows fullness. However, it’s generally advised for people with thin or sparsely haired brows. So, select your colour. Choose among brow pencils, powders, or pomades matching closely to the colour of your hair.

Start off by doing an outline of your brows edges with little dashes so it mimics hair. Then just fill in the center of the brow using the same technique. You should go in the same direction that your hair grows.

Finally, set them with some clear or tinted gel so that they stay all day!

Basic makeup preparation summary

  • Prep
  • Mositurize
  • Prime
  • Foundation
  • Conceal
  • Highlight
  • Contour
  • Blush
  • Brow fill

So now that you have a great idea of preparing your face for makeup and getting that foundation looking nice, we will look at other areas of the face next. Check out my next article on eye makeup!

4 Steps To Adding Eye Makeup

beautiful girl

Its all in the eyes!

So in my last article, we looked at the basics of literally laying a good foundation onto your lovely faces. Now that you are familiar with applying foundation, contouring and matching skin tones, let’s take a look at the next key feature of your face. Those lovely eyes!

Below are the four steps to follow to give those eyes the attention they deserve. You’ll have all the boys winking at you.

  1. Eyeshadow primer

This is really optional, but applying an eyeshadow primer to your eyeshadow will help it stay on a lot longer.

If you don’t use the primer, then you might find that your eyeshadow starts to fade or starts to become somewhat oily in texture. After a few hours, it may start to collect in your eyelids creases.

Using your finger, just dab your eyeshadow primer on, trying to blend in from your lash roots right up to the crease. For the perfect blending base, then set it with a powder.

  1. Eyeshadow

There are different techniques for applying eyeshadow. One single color to cover your whole eyelid tends to be the most common one. Using a brush for eyeshadow, put it on your eyelid by beginning in the center, close to your lash line and then blend it outwardly.

In an effort to prevent the formation of harsh lines, you should fade the eyeshadow right into your natural skin tone at your crease in addition to both the inner and outer corners of your eyes.

For a more dramatic style, just apply another color but darker and matte, in the shape of a “C”, beginning at the outer corner of the lash line right up to the top, outside of the crease on your eyelid. Finish it off with a lighter shimmer color.

  1. Eyeliner

Eyeliner is supposed to make the lash line appear fuller. So, choose a color similar to your natural hair to match your lashes. If you want a smudgy style, then using an eyeline pencil will give this effect. Similarly, you can create a smoothly sleek look by going for a liquid or cream option.

Create a dotted line across your lash line, connecting all of the dots to create a full looking line. You could also wing the end of the lash up and out a little if you like. That’s a bit more adventurous though!

  1. Finally, mascara

To finish off your eyes, you will need some mascara. Several different mascaras are out there, it all depends on the look you’re going for. For short lashes, use a mascara to add some length.

For thin lashes, use a mascara that adds volume. Dip mascara brush in and lightly wipe away any excess. Look directly ahead and apply mascara to your top lash by upwardly stroking. Starting off with the inner eye and working to the outer eye.

For best results, use two coats, allowing it to dry.

Look forward with your new eyes!

So there you go, four simple steps to nice eye makeup. Now have a go at your own and practice with different styles and techniques.

4 Steps To Adding Colour To Your Lips

lip lining

Kiss me and tell me Im beautiful!

A lot can be said about a lady’s lips. When we are run down, or in cold weather we can get chapped lips and they don’t look pretty.

Adding some colour is a great way to bring some life back to your lips and also makes you look more attractive. I’ve put together four steps to adding colour to your lips, try it out!

  1. Smooth them out!

Ladies, smoothen out those lips. Using a primer, sealer or lip balm will help with this. In addition, this will help to give any other lip products that you use a more vibrant look and feel and extend their lifespan.

Anyway, who wouldn’t choose soft lips over hard ones? Also, using a good salve or lip balm will prevent them from flaking later as you go about your day.

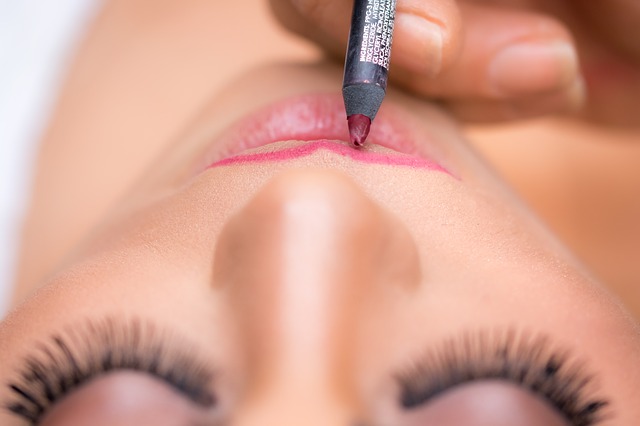
  1. Line those lips

Using a liner to match your lip colour, line out your lips. Next, sharpen the liner and apply a line around your natural. Now, with your outline done, grab a pencil to continue filling in the lips.

What this does, is it evens out the texture and colour of the lips. Why is this important? It makes it easier when applying any lipstick or gloss later on.

  1. Its lipsticktime! (or gloss)

Choose the gloss or lipstick of your and apply it over your lipliner. If you want a more natural look, then stay with a nude styled shade. If it’s more of a bold look you are after then go for a brighter hue. Starting with the lip centre, blend the colour outwardly.

Be careful and try to get as close to the outer edges of your lips as possible. What about lipstick on your teeth? Not to worry! Simply stick a finger right into your mouth, pulling out the lipstick quickly!

  1. Lay the final touches

When your lips are done, you are finished! However, check yourself over to ensure there aren’t any smudges or bits of loose makeup that need to be brushed off using a fluffy brush.

At this point, if there are any mistakes, use some makeup remover to sort them out.

After you have beautified your faces, lips and eyes, you should probably set your face by spraying on a setting spray. Simply hold the bottle one foot away from your face, spraying it a couple of time onto your whole face.

Now, you are finally ready for the Oscars, a wedding, or simply a casual night out!

Kiss kiss kiss

There are many products out there, from foundations and concealers to mascaras and all the brushes and tools of the trade you can imagine!

Some vary in quality, price and size. Depending on your budget, how often you get dolled up and what kind of a look you are going for, there should be something for you that meets all of your needs.

Even consider some of the natural product, although some might be a little more expensive, your future self will thank you for keeping that skin alive and healthier for longer!

Page 2 of 2